Donnerstag, 25. April 2013

Forearm survey

I love knitting armwarmers. But I've always been disappointed in the sizing and shaping - or lack thereof. I didn't find one single pattern that would fit if I just knitted it without any mods.

I want to find out now if I'm really outside of the norm, and if there is a market for a larger range of sizes for armwarmers. Please help and fill out the survey below! I'll post the results in a couple of weeks.

Please round to the nearest  full centimeter.


Create your free online surveys with SurveyMonkey , the world's leading questionnaire tool.

Mittwoch, 17. April 2013

the crazy finishing streak!

Back when I started knitting, I was, what is called a "monogamous knitter". I never had more than one project on the needles, and I was happy with it.

That was... well, a while back. Still, I like to work on only one project at a time... but sometimes, there are reasons to put things in time out! And that happened a lot to me lately. But last week, I was suddenly able to finish all my wips, and suddenly I had not a single one left! Oh, that great feeling of accomplishment! That feeling of freedom! I can now cast on something new!

First was this cardi that had accompanied me for more than a year now. I'm so happy it's finally over and done with. It had many names - the never ending cardi - the cardi of the many bobbins - and some other that I don't really remember anymore. This was not the most complicated, but surely the most tiring knit I ever had otn.


A look into the innards of the cardi - you can see the bobbins carried up and the wrong side of the berry stitch.


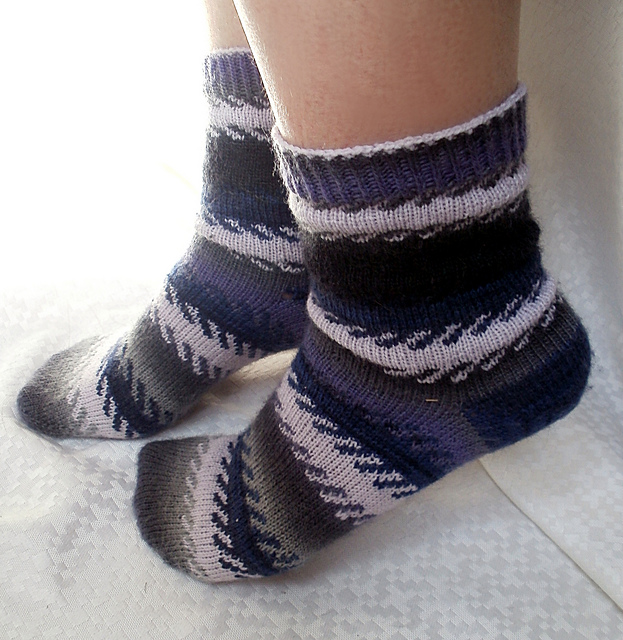
Second where the stockings I had otn for my Papa. This was a Christmas present. I was running late on Christmas and couldn't find any of the weird and obscure CD's he wanted, to I just packed three skeins and draw a fun "instruction manual" on a little piece of paper. How to use this present? Choose a skein, give it to the master of needles, and get a pair of socks. And then, my "evil" stepmom had one ingenious idea. "Why not knit stockings instead? You could use some!" she said to my dad. I really love her, but I really wanted to strangle her at that moment. But yeah, she was true, my Papa has only one old ugly worn-through pair of stockings, so I had to knit some.

Ever knit a man's pair of stockings? Not fun, I assure you. This pair is the equivalent of two really tall socks for me, or 3-4 normal pairs of socks for normal feeted women. Over 800 m of yarn!!!


In between waiting for fitting on these two projects for other people, I had time to work on a third project. And still being a little bit of a more monogamous knitter, I just couldn't bring myself to cast on another project. And that was good, because I finally had a reason to pick up some wips! I'm really not bad - I had only two wips in hibernation. The first one was another pair of stockings for me, and I really found my love back for them. And although they were stockings - compared to the two projects above, they really were a fast knit. ;)


And after those three were finished, I was so happy with clearing out my wips that I took another sip (sock in progress). This one was a test knit, and I never made a mate for the first poor, lonely sock. This first sock is now happily ever after with it's mate!


And then I thought I'd go back to my monogamous knitting ways. Well... that didn't work so well. I knitted two toes for another pair of socks - then swatched the cable pattern and had to put it in time out since I couldn't decide immediately. Then I cast on a shawl. And one day after I cast on a shawl, the needles arrived that I need for my first big design. And since the sweater design has the highest priority, I started swatching for that.

But know what? I'm not even feeling bad about it. I have it all sorted in clear priorities, and I'm getting some progress on all. And maybe the sock toes won't grow in a while - but I know they will as soon as I'm not knitting on the other two for whatever reason. I'll never be a project hoarder, having dozens of lone socks lying around. My urge to knit on the things I have otn is just too big. And that feels good.

But now, how about some more pictures? The little swatch of the stitch pattern for my sweater design. I absolutely adore this texture! And it's easy to work, too!
(sorry for the bad pic. Sometimes the light situation just doesn't allow me to get good pics)


And the shawl in progress. It still looks boring at that stage, but the finished shawl will be constructed of several wedges in different angles, which looks really cool. I'm already loving this knit, and the yarn is heavenly! A mostly merino with some silk and cashmere from Dye for yarn. This yarn is really to die for! Or should I say dye for? They also have funny color names, this one is called "memory of a fearsome tale". It's purple in reality, but I must admit I was too lazy to edit the photo. My camera never gets purple right...


Sonntag, 14. April 2013

Technique: Turkish Cast On

There are millions of different ways to cast on socks. Even as experienced sock knitter, you might run across a new way you've never seen before. And I like to try out all possibilities. I've recently discovered the Turkish Cast On - also called Straight Wrap Cast On, Eastern European Cast On, Eastern Cast on or Mediterranean Cast On. I've been a fan of Judy's Magic Cast On for a long time, but now I'm not so sure anymore... I might like this one a tad bit more.

You'll need:
  • your working yarn
  • circular needle
It can be done with dpns, but I find it much easier to work with a circ. This time I'm working with Dream in Color Smoothy.

Hold both needles parallel to each other. Leaving a few inches tail, lay the yarn over the bottom needle and bring it down between the needles, wrapping it under the top needle. In the picture shown below, the yarn tail is on the left bottom side. The tail I left for this tut was way too short - I'll explain why you don't want a too short tail a little later. Alternatively, you could also start with a slip knot on the top needle.  Then, wrap the yarn around both needles as shown in the picture below.


Continue wrapping the yarn around both needles until you have the desired amount of stitches on your needles. I like to cast on 24 stitches for my toes, so I did 12 wraps. After the last wrap, bring it up between the needles to secure last wrap. I just noticed that there are 13 wraps on the needles in the two pictures below - my mistake. I must have dropped the last wrap while knitting the first round.


This is the point where it gets really awkward to work with dpns. As you see, I've pulled the bottom needle to the right and am now starting to knit into the loops on the top needle.


Be extremely careful when you get to the end of the first needle! The yarn tail likes to slip away and unwrap the stitches. You can avoid that by using the slip knot, but I don't like starting with a slip knot as it usually gives me a diminutive hole. Yes, I can be a perfectionist. (It happened to me that the yarn slipped and I had to rewrap the last stitches. Which is a good thing in this case since I had a wrap to much. Obviously someone here cant count to 12.)


My Cast On, Bind Off book now tells me to twist the yarn tail around the working yarn another time. But I don't really like this. For one: it also gives me a diminutive hole - again, the perfectionist. Second - at this point, I don't see the helpfulness anymore. The trouble we had with the yarn tail was at the step before, and as soon as we knit the first stitch of the second needle, the yarn tail is secured and we only need to tug on it to tighten up the stitches. Anyway, I showed it here, you might like it more than I do.


Continue knitting all the stitches on the second needle and start with your toe increase rounds and pattern.


This is how the the Cast On looks with the toe almost done.


Questions, comments, suggestions, requests? I'd love to hear from you!

Donnerstag, 4. April 2013

Technique: Duo-Colored Lateral Braid

Last time, we talked about how to do a lateral Braid. And this little detail just asks to be done in a contrasting color. Problem is... if you just take a CC, and work it like shown the last time, this is what you get:

Not exactly what we wanted, right? But there is a way to make it look neat. It's harder to work, especially if you are, like me, a tight knitter. But it's possible.

You'll need:
  • your working needle
  • your working yarn
  • CC yarn
  • darning needle
 First off, we start with a M1r - just like last time - but this time, it's the first stitch done in CC. Place it back onto the lhn (left hand needle).


Insert your rhn (right hand needle) into the back loop of second stitch as if to knit. But this time, we are not knitting it! This stitch is the one that would form the next round of stitches, which we are trying to avoid this time.


Swing rhn around to the front, without dropping stitches from the lhn.


Knit into the front of first stitch on lhn, using CC.


And drop both stitches from the lhn.

Place CC stitch back onto lhn and start on the next pair of stitches with inserting your needle into the back of second stitch.


This is how it looks like after we have done a few stitches... Tricky, but worth the effort, isn't it?


Work braid until one stitch before end of round. 

Now, the end of round is a little more complicated than shown last time, but not really hard to work. If you don't mind cutting your yarn, you could also close a monochrome braid this way - and get a perfectly seamless join.


We need to drop the last braid stitch from the needle, cut CC and pull on the dropped loop until the end slips through. Thread yarn through darning needle.


Thread the needle under both loops of the first CC stitch of round.


And then back trough the last stitch of round.


Tighten up. As you see, we now have a perfectly seamless, duo-colored lateral braid! Don't forget to sew in yarn tails .


Questions, comments, suggestions, requests? Just leave a comment and I'll get back at you!